Email Migration to cPanel Using Outlook
Knowledgebase Articles and news
Email Migration to cPanel Using Outlook
Email Migration is a method to migrate an email or multiple email messages from one email client to another email client. The protocols mainly used in email communication are POP3, IMAP, and SMTP.
Post Office Protocol (POP) is a standard email protocol. It is used to receive emails from a remote server to a local client. The IMAP (Internet Message Access Protocol) is used to access emails that are on the remote web server from a local client. These two protocols are the commonly used email protocol for retrieving emails. Whereas, the Simple Mail Transfer Protocol (SMTP) is the standard protocol used by the server to send emails across the Internet.
How to Change an Account from POP to IMAP in Outlook
You can use the following steps to change the email protocol from POP3 to IMAP in Outlook.
1. BACKUP YOUR MAILBOXES
If you switch from POP3 to IMAP, it deletes all the existing emails. So, it is recommended to take the backup of your mailboxes to avoid losing any relevant emails.
1. Open Outlook and select ‘File’.
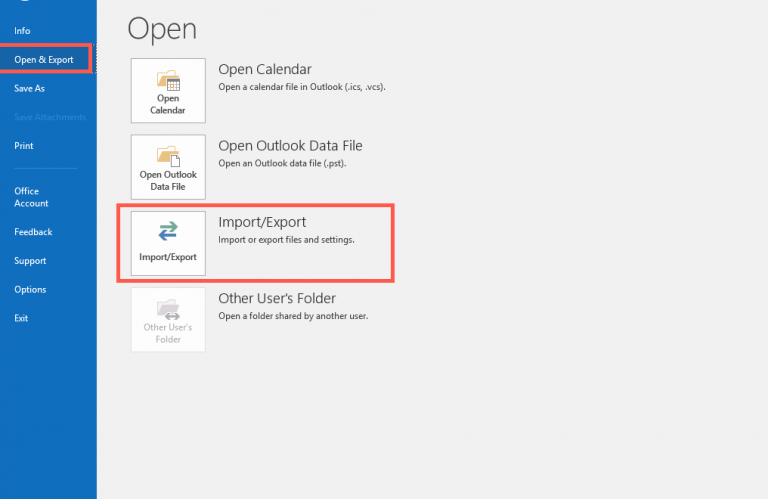
2. Select the ‘Import/Export’ option under the ‘Open & Export’ section.
3. Select ‘Export to a file’ option from the Import and Export Wizard and click ‘Next’.
4. Select ‘Outlook Data File (.pst) as the file type and click ‘Next’.
5. Now select the mailboxes you would like to backup. It is recommended to backup all your mailboxes by selecting your email address in the Export Outlook Data File window. Also, ensure that you have checked the ‘Include subfolders’ box and then click ‘Next’ to continue.
6. Select a location on your computer to save the backup and click ‘Finish’. You can secure this backup file by creating an optional password for the file.
2. DELETE THE POP ACCOUNT FROM YOUR COMPUTER
Once you save the backup to the system, you can delete the POP account in Outlook. Also, make sure that you delete the account on other devices that you use for email. To do that, follow the steps given below.
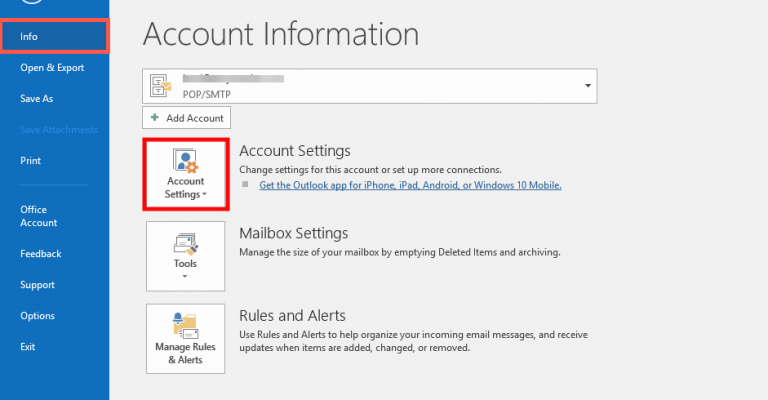
1. Select the ‘File’ option in Outlook and click ‘Info’.
2. Click the small arrow next to ‘Account Settings’ to select the ‘Account Settings’ option.
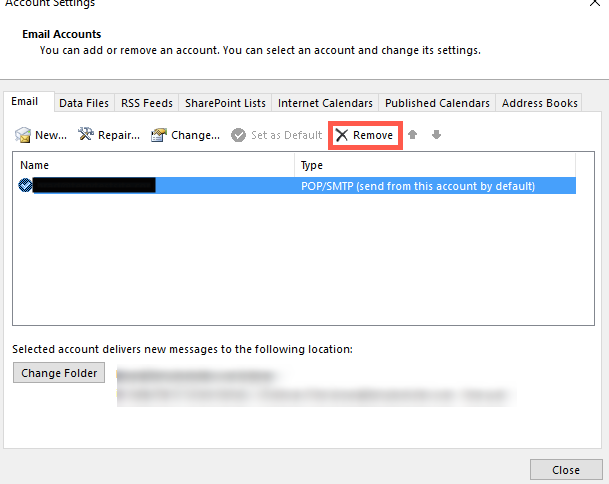
3. Select the email account and click ‘Remove’ to delete it from Outlook in the Account Settings window. The system warns that the offline messages will get deleted. Click ‘Yes’ to continue.
3. SET UP THE IMAP ACCOUNT ON YOUR COMPUTER
1. Click the ‘New’ button in the Account Settings window to create a new email account on your computer. Alternatively, you can add the same by clicking the file in the top menu and then click ‘Add Account’.
2. Select ‘Manual setup or additional server types’ option and click ‘Next’ to continue.
3. Select POP or IMAP option under the ‘Choose Your Account Type’ window and click Next.
4. Enter the IMAP server settings for your email account. You can see your server settings from the cPanel ‘Email Accounts’ option. After filling all the details, you can click ok and then ‘Next’ to proceed.
5. Then click Close and Finish.
4. RESTORE YOUR MAILBOX
If you wish to restore all your old emails to the new set up, then you can follow the below process.
1. Choose ‘File’ from the top menu of Outlook and then select ‘Import/Export’ under the Open & Export option.
2. Select ‘Import from another program or file’ option and click ‘Next’.
3. Select the file type as Outlook Data File (.pst) in the Import a File window and click ‘Next’ to proceed.
4. Now select the backup file and also the options to configure how Outlook treats duplicate items and click ‘Next’ to continue. If the backup is secured, then you need to authorize the import by entering the password.
5. Select which folder you would like to restore your data into and click Finish to complete.
How to Transfer Emails to cPanel Mail Account Using Outlook
The following conditions should be met to transfer the emails from the old mail provider to cPanel.
1. You should have active email services in both the end.
2. The email client should support IMAP/POP/SMTP protocol.
By using this method, we can set up two email accounts with old and new mail provider and then drag-and-drop existing emails to the new email server. You can use the below step by step instructions to transfer emails to the cPanel mail account using an Outlook email client.
1. SETUP EMAIL ACCOUNT HOSTED ON THE OLD SERVER
If the email account is not set up in your email client, then you need to contact your previous email provider for setup instructions. If the email account is already set up in the old server, then you can skip this step.
2. SETUP EMAIL ACCOUNT HOSTED ON THE NEW SERVER
Make sure to set up the email account on the new server. If you have not set the email account, you can follow the following steps to set up an email account in cPanel.
1. Log in to your cPanel and select the ‘Email Accounts’ under the Email section.
2. Navigate to the ‘+Create’ button.
3. Select the domain name from the drop-down and set the username and password for the same, then click ‘+Create’.
4. Click ‘Check Email’ next to the email account to login to the webmail.
It is recommended to configure the server hostnames as incoming-outgoing server names instead of the ‘mail.yourdomain.com subdomain. Always make sure that the email account hosted in cPanel is set up as IMAP.
3. EMAIL TRANSFER FROM THE OLD SERVER TO THE NEW SERVER
After the setup of both the accounts, you can see them in your email client window. The old server account has all the existing emails, and the new one should be empty. To transfer emails, you can select the old account and drag-and-drop them to the new account folder.
If all the emails transfer or tasks are complete, then consider the email migration complete. You can move single, multiple emails, or even subfolders from one server to another at the same time.
After DNS records are changed, it is recommended to wait for 24 hours to make sure the new emails are coming to the new server. After the setup is completed and looks good, you can go ahead and remove the old account.
If you need any further help, please do reach our support department.
Articles
7 Articles- Email Account Password Reset in cPanel
- Email Migration to cPanel Using Outlook
- Error Child failed to make LIVEAPI connection to cPanel. - Softaculous
- Finding Your Email Settings in Webmail and cPanel
- How to Block Email Spam with Postfix SMTP Server
- How to Configure Email Routing in cPanel
- How to Manage Email Accounts Suspension in cPanel?